SSM 架构基础
文章目录
一、简介
Spring 框架是 Java 应用最广的框架,它的成功来源于理念,而不是技术本身,spring框架是一个为Java应用程序的开发提供了综合、广泛的基础性支持的Java平台。
spring主要的核心依赖有beans,code, context,spel 这是spring里最基本的也是最核心的jar包(或者说是依赖)
spring有两个核心思想:IOC (控制反转) , AOP(面向切面编程)
spring容器可以理解为生产对象(OBJECT)的地方,在这里容器不只是帮我们创建了对象那么简单,它负责了对象的整个生命周期--创建、装配、销毁。
而这里对象的创建管理的控制权都交给了Spring容器,所以这是一种控制权的反转,称为IOC容器,而这里IOC容器不只是Spring才有,很多框架也都有该技术。
springmvc是spring的子框架,继承于spring框架 , 在ssm框架环境中,springmvc可以向上的扫描去用spring的东西,但是spring却不能扫描到springmvc里面去。
springmvc也是接收请求,返回响应 ,实际上也是一个servlet ,dispatchServlet。
springmvc和servlet的流程是差不多的,都是接受请求,返回响应,和 Sping 无缝结合
mybatis是目前非常流行的持久层框架,功能很强大,然而其实现却比较简单、优雅。mybatis是一个半自动的orm框架,也还是需要自己去写sql语句
mybatis是支持定制化 SQL、存储过程以及高级映射的优秀的持久层框架,其主要就完成2件事情:
- 封装JDBC操作
- 利用反射打通Java类与SQL语句之间的相互转换
mybatis的主要设计目的就是让我们对执行SQL语句时对输入输出的数据管理更加方便,所以方便地写出SQL和方便地获取SQL的执行结果才是MyBatis的核心竞争力。
mybatis和大部分框架一样需要一个配置文件,如果是和spring整合的话则不怎么需要,当然如果要开启缓存的话还是需要
然后需要mapper映射文件和dao层的类和方法所对应 , 在mapper里面写sql语句
单独的mybatis使用需要解析配置文件,然后去调用mapper里的sql语句
二、Spring
2.1 Spring xml写法
原始类:
1public class Source {
2    private String property01;
3    private String property02;
4    /* setter and getter */
5}
bean.xml 文件:
1<beans xmlns="http://www.springframework.org/schema/beans"
2       xmlns:xsi="http://www.w3.org/2001/XMLSchema-instance"
3       xsi:schemaLocation="http://www.springframework.org/schema/beans http://www.springframework.org/schema/beans/spring-beans.xsd">
4    <bean name="source" class="pojo.Source">
5        <property name="property01" value="v01"/>
6        <property name="property02" value="v02"/>
7    </bean>
8</beans>
测试类
 1public class TestSpring {
 2    @Test
 3    public void test(){
 4        ApplicationContext context = new ClassPathXmlApplicationContext(
 5                new String[]{"applicationContext.xml"}
 6        );
 7        Source source = (Source) context.getBean("source");
 8        System.out.println(source.property01());
 9        System.out.println(source.property02());
10    }
11}
ApplicationContext 是 BeanFactory 的子接口之一
换句话说:BeanFactory 是 Spring IoC 容器所定义的最底层接口,而 ApplicationContext 是其最高级接口之一,并对 BeanFactory 功能做了许多的扩展,所以在绝大部分的工作场景下,都会使用 ApplicationContext 作为 Spring IoC 容器。
如果说BeanFactory是Sping的心脏,那么ApplicationContext就是完整的身躯了
2.2 通过注解装配 Bean
传统的Spring做法是使用.xml文件来对bean进行注入或者是配置aop、事物,这么做有两个缺点:
- 如果所有的内容都配置在.xml文件中,那么.xml文件将会十分庞大;如果按需求分开.xml文件,那么.xml文件又会非常多。总之这将导致配置文件的可读性与可维护性变得很低
- 在开发中在.java文件和.xml文件之间不断切换,是一件麻烦的事,同时这种思维上的不连贯也会降低开发的效率
为了解决这两个问题,Spring引入了注解,通过 "@XXX" 的方式,让注解与Java Bean紧密结合,既大大减少了配置文件的体积,又增加了Java Bean的可读性与内聚性。
 1@Component(value = "source1")
 2public class Source {
 3
 4    @Value("1")
 5    int id;
 6
 7    @Value("student_name_1")
 8    String name;
 9
10    // getter and setter
11}
下面是几个基础注解,更多注解及含义请参见: Spring 常用注解
@Component
把普通pojo实例化到spring容器中,相当于配置文件中的 <bean id="" class=""/>
@Component是一个元注解,意思是可以注解其他类注解,如@Controller @Service @Repository @Aspect。
官方的原话是:带此注解的类看为组件,当使用基于注解的配置和类路径扫描的时候,这些类就会被实例化。
其他类级别的注解也可以被认定为是一种特殊类型的组件,比如@Repository @Aspect。所以,@Component可以注解其他类注解。
@Autowired
Autowired(自动装配)注释可以对类成员变量、方法及构造函数进行标注,完成自动装配的工作。 其作用是为了消除代码Java代码里面的getter/setter与bean属性中的property。
@Autowired 根据类型(type)进行自动注入,默认注入单例(SingleTon)的bean 。
如果发现找到有很多bean,则按照byName方式对比获取,若有名称一样的则可以加上@Qualifier("XXX")配置使用。若非必须装配则可以设置required=false。
 1@Component("studentService")
 2public class StudentServiceImp implements StudentService {
 3
 4    @Autowired
 5    private Student source = null;
 6
 7    public void printStudentInfo() {
 8        System.out.println(source.getName());
 9    }
10}
@Configuration @Bean 注解
@Bean 注解 可以标记在方法和注解上面,主要标记在方法上.被标记的方法的返回值会被加入到springIOC容器之中
使用 @Bean 注解的好处就是能够动态获取一个 Bean 对象,能够根据环境不同得到不同的 Bean 对象。或者说将 Spring 和其他组件分离(其他组件不依赖 Spring,但是又想 Spring 管理生成的 Bean)
1@Configuration
2public class AppConfig {
3
4    @Bean
5    public TransferService transferService() {
6        return new TransferServiceImpl();
7    }
8
9}
这个配置就等同于之前在xml里的配置
1<beans>
2    <bean id="transferService" class="com.acme.TransferServiceImpl"/>
3</beans>
2.3 AOP
AOP技术利用一种称为"横切"的技术,剖解开封装的对象内部,并将那些影响了多个类的公共行为封装到一个可重用模块,并将其命名为"Aspect",即切面。所谓"切面",简单说就是那些与业务无关,却为业务模块所共同调用的逻辑或责任封装起来,便于减少系统的重复代码,降低模块之间的耦合度,并有利于未来的可操作性和可维护性。
使用"横切"技术,AOP把软件系统分为两个部分:核心关注点和横切关注点。业务处理的主要流程是核心关注点,与之关系不大的部分是横切关注点。横切关注点的一个特点是,他们经常发生在核心关注点的多处,而各处基本相似,比如权限认证、日志、事物。AOP的作用在于分离系统中的各种关注点,将核心关注点和横切关注点分离开来。
第一步:选择连接点
Spring 是方法级别的 AOP 框架,我们主要也是以某个类额某个方法作为连接点,另一种说法就是:选择哪一个类的哪一方法用以增强功能。
1public void service() {
2    // 核心的业务功能
3    System.out.println("签合同");
4    System.out.println("收房租");
5}
第二步:创建切面
 1@Component
 2@Aspect
 3class Broker {
 4
 5    @Before("execution(* pojo.Landlord.service())")
 6    public void before(){
 7        System.out.println("带租客看房");
 8        System.out.println("谈价格");
 9    }
10
11    @After("execution(* pojo.Landlord.service())")
12    public void after(){
13        System.out.println("交钥匙");
14    }
15}
第三步:定义切点
 1@Component
 2@Aspect
 3class Broker {
 4
 5    @Pointcut("execution(* pojo.Landlord.service())")
 6    public void lService() {
 7    }
 8
 9    @Before("lService()")
10    public void before() {
11        System.out.println("带租客看房");
12        System.out.println("谈价格");
13    }
14
15    @After("lService()")
16    public void after() {
17        System.out.println("交钥匙");
18    }
19}
第四步:测试 AOP
三、SpringMVC
3.1 运行原理:
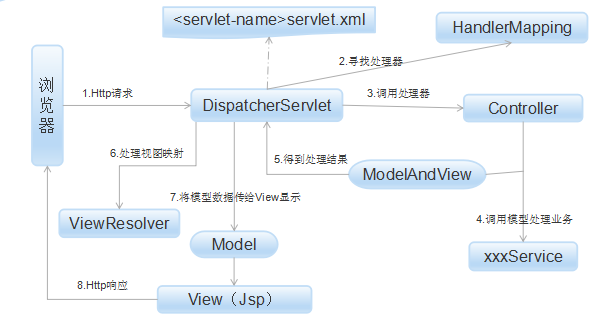
(1) Http请求:客户端请求提交到DispatcherServlet。
(2) 寻找处理器:由DispatcherServlet控制器查询一个或多个HandlerMapping,找到处理请求的Controller。
(3) 调用处理器:DispatcherServlet将请求提交到Controller。
(4)(5)调用业务处理和返回结果:Controller调用业务逻辑处理后,返回ModelAndView。
(6)(7)处理视图映射并返回模型: DispatcherServlet查询一个或多个ViewResoler视图解析器,找到ModelAndView指定视图
(8) Http响应:视图负责将结果显示到客户端。
接口:
(1)DispatcherServlet接口:
Spring提供的前端控制器,所有的请求都有经过它来统一分发。在DispatcherServlet将请求分发给Spring Controller之前,需要借助于Spring提供的HandlerMapping定位到具体的Controller。
(2)HandlerMapping接口:
能够完成客户请求到Controller映射。
(3)Controller接口:
需要为并发用户处理上述请求,因此实现Controller接口时,必须保证线程安全并且可重用。
Controller将处理用户请求,这和Struts Action扮演的角色是一致的。一旦Controller处理完用户请求,则返回ModelAndView对象给DispatcherServlet前端控制器,ModelAndView中包含了模型(Model)和视图(View)。
从宏观角度考虑,DispatcherServlet是整个Web应用的控制器;从微观考虑,Controller是单个Http请求处理过程中的控制器,而ModelAndView是Http请求过程中返回的模型(Model)和视图(View)。
(4)ViewResolver接口:
Spring提供的视图解析器(ViewResolver)在Web应用中查找View对象,从而将相应结果渲染给客户。
DispatcherServlet:
整个Spring MVC的核心。它负责接收HTTP请求组织协调Spring MVC的各个组成部分。其主要工作有以下三项:
- 截获符合特定格式的URL请求。
- 初始化DispatcherServlet上下文对应WebApplicationContext,并将其与业务层、持久化层的WebApplicationContext建立关联。
- 初始化Spring MVC的各个组成组件,并装配到DispatcherServlet中。
3.2 传统方式:
dispatcher-servlet.xml
 1<bean id="simpleUrlHandlerMapping"
 2          class="org.springframework.web.servlet.handler.SimpleUrlHandlerMapping">
 3        <property name="mappings">
 4            <props>
 5                <!-- /hello 路径的请求交给 id 为 helloController 的控制器处理-->
 6                <prop key="/hello">helloController</prop>
 7            </props>
 8        </property>
 9    </bean>
10    <bean id="helloController" class="controller.HelloController"></bean>
11</beans>
Controller:
1public class HelloController implements Controller {
2    public ModelAndView handleRequest(javax.servlet.http.HttpServletRequest httpServletRequest, javax.servlet.http.HttpServletResponse httpServletResponse) throws Exception {
3        ModelAndView mav = new ModelAndView("index.jsp");
4        mav.addObject("message", "Hello Spring MVC");
5        return mav;
6    }
7}
View: index.jsp
1<%@ page language="java" contentType="text/html; charset=UTF-8" pageEncoding="UTF-8" isELIgnored="false"%>
2<h1>${message}</h1>
3.3 使用注解配置 Spring MVC
Controller:
 1@Controller
 2public class HelloController{
 3
 4    @RequestMapping("/hello")
 5    public ModelAndView handleRequest(javax.servlet.http.HttpServletRequest httpServletRequest, javax.servlet.http.HttpServletResponse httpServletResponse) throws Exception {
 6        ModelAndView mav = new ModelAndView("index.jsp");
 7        mav.addObject("message", "Hello Spring MVC");
 8        return mav;
 9    }
10}
使用 @Controller 注解,在对应的方法上,视图解析器可以解析return 的jsp,html页面,并且跳转到相应页面
若返回json等内容到页面,则需要加**@ResponseBody注解**,@RestController注解相当于@ResponseBody + @Controller合在一起的作用
使用@RequestMapping 注解映射请求路径,@RequestMapping 既可以定义在类上,也可以定义方法上
dispatcher-servlet.xml :
 1<beans xmlns="http://www.springframework.org/schema/beans"
 2xmlns:xsi="http://www.w3.org/2001/XMLSchema-instance"
 3xmlns:context="http://www.springframework.org/schema/context"
 4xsi:schemaLocation="http://www.springframework.org/schema/beans http://www.springframework.org/schema/beans/spring-beans.xsd http://www.springframework.org/schema/context http://www.springframework.org/schema/context/spring-context.xsd">
 5
 6    <!-- 扫描controller下的组件 -->
 7    <context:component-scan base-package="controller"/>
 8</beans>
 9
10<!-- 配置视图解析器 -->
11<bean id="viewResolver"
12      class="org.springframework.web.servlet.view.InternalResourceViewResolver">
13    <property name="prefix" value="/WEB-INF/page/" />
14    <property name="suffix" value=".jsp" />
15</bean>
数据显示
 1@RequestMapping("hello")
 2public String testVelocity(Model model,String name){
 3    model.addAttribute("name",name);
 4    return "hello";
 5}
 6
 7@RequestMapping("model")
 8public ModelAndView testModel(String name) {
 9    //构建ModelAndView实例,并设置跳转地址
10    ModelAndView view = new ModelAndView("test");
11    //将数据放置到ModelAndView对象view中,第二个参数可以是任何java类型
12    view.addObject("name",name);
13    //返回ModelAndView对象view
14    return view;
15}
跳转:
1@RequestMapping("/jump")
2public String jump() {
3    return "redirect: ./hello";
4}
四、MyBatis
4.1 基本配置
数据库配置文件:mybatis-config.xml
 1<?xml version="1.0" encoding="UTF-8"?>
 2<!DOCTYPE configuration PUBLIC "-//mybatis.org//DTD Config 3.0//EN" "http://mybatis.org/dtd/mybatis-3-config.dtd">
 3<configuration>
 4    <!-- 别名 -->
 5    <typeAliases>
 6        <package name="pojo"/>
 7    </typeAliases>
 8    <!-- 数据库环境 -->
 9    <environments default="development">
10        <environment id="development">
11            <transactionManager type="JDBC"/>
12            <dataSource type="POOLED">
13                <property name="driver" value="com.mysql.jdbc.Driver"/>
14                <property name="url" value="jdbc:mysql://localhost:3306/mybatis?characterEncoding=UTF-8"/>
15                <property name="username" value="root"/>
16                <property name="password" value="root"/>
17            </dataSource>
18        </environment>
19    </environments>
20    <!-- 映射文件 -->
21    <mappers>
22        <mapper resource="pojo/Student.xml"/>
23    </mappers>
24</configuration>
Mapper 文件:StudentMapper.xml
 1<?xml version="1.0" encoding="UTF-8"?>
 2<!DOCTYPE mapper
 3PUBLIC "-//mybatis.org//DTD Mapper 3.0//EN"
 4"http://mybatis.org/dtd/mybatis-3-mapper.dtd">
 5<mapper namespace="pojo">
 6    <select id="listStudent" resultType="Student">
 7        select * from  student
 8    </select>
 9
10    <insert id="addStudent" parameterType="Student">
11        insert into student (id, studentID, name) values (#{id},#{studentID},#{name})
12    </insert>
13
14    <delete id="deleteStudent" parameterType="Student">
15        delete from student where id = #{id}
16    </delete>
17
18    <select id="getStudent" parameterType="_int" resultType="Student">
19        select * from student where id= #{id}
20    </select>
21
22    <update id="updateStudent" parameterType="Student">
23        update student set name=#{name} where id=#{id}
24    </update>
25</mapper>
测试类
 1public class TestMyBatis {
 2    public static void main(String[] args) throws IOException {
 3        // 根据 mybatis-config.xml 配置的信息得到 sqlSessionFactory
 4        String resource = "mybatis-config.xml";
 5        InputStream inputStream = Resources.getResourceAsStream(resource);
 6        SqlSessionFactory sqlSessionFactory = new SqlSessionFactoryBuilder().build(inputStream);
 7
 8        // 然后根据 sqlSessionFactory 得到 session
 9        SqlSession session = sqlSessionFactory.openSession();
10
11        // 增加学生
12        Student student1 = new Student();
13        student1.setId(4);
14        student1.setStudentID(4);
15        student1.setName("新增加的学生");
16        session.insert("addStudent", student1);
17
18        // 删除学生
19        Student student2 = new Student();
20        student2.setId(1);
21        session.delete("deleteStudent", student2);
22
23        // 获取学生
24        Student student3 = session.selectOne("getStudent", 2);
25
26        // 修改学生
27        student3.setName("修改的学生");
28        session.update("updateStudent", student3);
29
30        // 最后通过 session 的 selectList() 方法调用 sql 语句 listStudent
31        List listStudent = session.selectList("listStudent");
32        for (Student student : listStudent) {
33            System.out.println("ID:" + student.getId() + ",NAME:" + student.getName());
34        }
35        // 提交修改
36        session.commit();
37        // 关闭 session
38        session.close();
39    }
40}
应用程序找 MyBatis 要数据 MyBatis 从数据库中找来数据
1.通过 mybatis-config.xml 定位哪个数据库
2.通过 Student.xml 执行对应的 sql 语句
3.基于 Student.xml 把返回的数据库封装在 Student 对象中
4.把多个 Student 对象装载一个 Student 集合中
4.2 使用注解开发 MyBatis
为 Mapper 增加注解:
 1public interface StudentMapper {
 2
 3	// 根据 id 查询学生信息
 4	@Select("SELECT * FROM student WHERE student_id = #{id}")
 5	public Student findStudentById(int id) throws Exception;
 6
 7	// 添加学生信息
 8	@Insert("INSERT INTO student(student_id, name) VALUES(#{id}, #{name})")
 9	public void insertStudent(Student student) throws Exception;
10
11	// 删除学生信息
12	@Delete("DELETE FROM student WHERE student_id = #{id}")
13	public void deleteStudent(int id) throws Exception;
14
15	// 修改学生信息
16	@Update("UPDATE student SET name = #{name} WHERE student_id = #{id}")
17	public void updateStudent(Student student) throws Exception;
18}
mybatis-config.xml:
1<mappers>
2    <!--<mapper resource="pojo/StudentMapper.xml"/>-->
3    <mapper class="mapper.StudentMapper"/>
4</mappers>
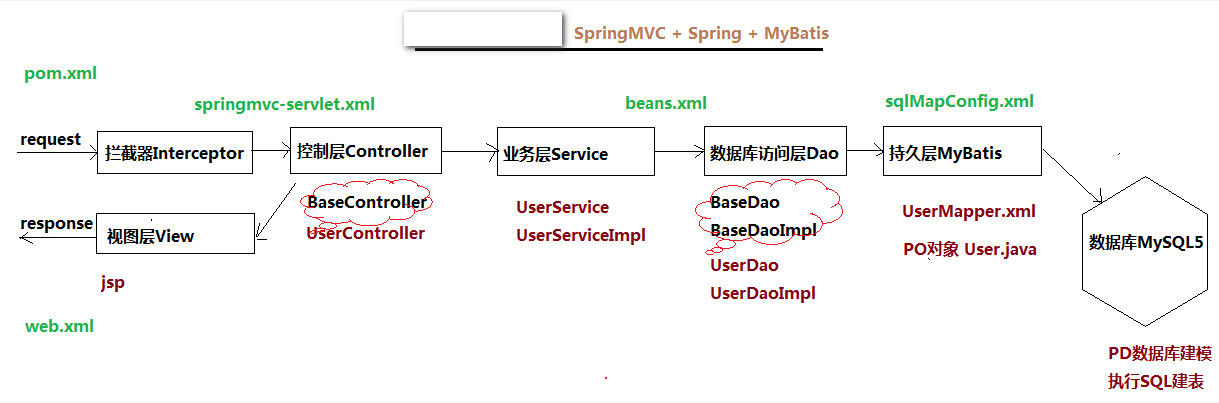
五、Spring+SpringMVC+MyBatis (Maven)
5.1 创建SqlMapperContext.xml全局配置文件
 1<?xml version="1.0" encoding="UTF-8" ?>
 2<!DOCTYPE configuration
 3PUBLIC "-//mybatis.org//DTD Config 3.0//EN"
 4"http://www.mybatis.org/dtd/mybatis-3-config.dtd">
 5<configuration>
 6  <typeAliases>
 7       <package name="com.fjm.ssm.po"/>
 8   </typeAliases>
 9
10</configuration>
5.2 Spring 和 Mybatis 配置:
spring-mybatis.xml
 1<?xml version="1.0" encoding="UTF-8"?>
 2<beans xmlns="http://www.springframework.org/schema/beans"
 3       xmlns:xsi="http://www.w3.org/2001/XMLSchema-instance"
 4       xmlns:context="http://www.springframework.org/schema/context" xmlns:tx="http://www.springframework.org/schema/tx"
 5       xsi:schemaLocation="http://www.springframework.org/schema/beans
 6       http://www.springframework.org/schema/beans/spring-beans.xsd
 7       http://www.springframework.org/schema/context
 8       http://www.springframework.org/schema/context/spring-context.xsd http://www.springframework.org/schema/tx http://www.springframework.org/schema/tx/spring-tx.xsd">
 9
10    <!-- 配置数据库相关参数properties的属性:${url} -->
11    <context:property-placeholder location="classpath:jdbc.properties"/>
12
13    <!-- 数据库连接池 -->
14    <bean id="dataSource" class="com.mchange.v2.c3p0.ComboPooledDataSource">
15        <property name="driverClass" value="${jdbc.driver}"/>
16        <property name="jdbcUrl" value="${jdbc.url}"/>
17        <property name="user" value="${jdbc.username}"/>
18        <property name="password" value="${jdbc.password}"/>
19        <property name="maxPoolSize" value="${c3p0.maxPoolSize}"/>
20        <property name="minPoolSize" value="${c3p0.minPoolSize}"/>
21        <property name="autoCommitOnClose" value="${c3p0.autoCommitOnClose}"/>
22        <property name="checkoutTimeout" value="${c3p0.checkoutTimeout}"/>
23        <property name="acquireRetryAttempts" value="${c3p0.acquireRetryAttempts}"/>
24    </bean>
25
26    <!-- 配置SqlSessionFactory对象 -->
27    <bean id="sqlSessionFactory" class="org.mybatis.spring.SqlSessionFactoryBean">
28        <!-- 注入数据库连接池 -->
29        <property name="dataSource" ref="dataSource"/>
30        <!-- 扫描entity包 使用别名 -->
31        <property name="typeAliasesPackage" value="cn.wmyskxz.entity"/>
32        <!-- 扫描sql配置文件:mapper需要的xml文件 -->
33        <property name="mapperLocations" value="classpath:mapper/*.xml"/>
34    </bean>
35
36    <!-- 配置扫描Dao接口包,动态实现Dao接口,注入到spring容器中 -->
37    <bean class="org.mybatis.spring.mapper.MapperScannerConfigurer">
38        <!-- 注入sqlSessionFactory -->
39        <property name="sqlSessionFactoryBeanName" value="sqlSessionFactory"/>
40        <!-- 给出需要扫描Dao接口包 -->
41        <property name="basePackage" value="cn.wmyskxz.dao"/>
42    </bean>
43</beans>
5.3 Spring Service 配置:
spring-service.xml
 1<?xml version="1.0" encoding="UTF-8"?>
 2<beans xmlns="http://www.springframework.org/schema/beans"
 3       xmlns:xsi="http://www.w3.org/2001/XMLSchema-instance"
 4       xmlns:aop="http://www.springframework.org/schema/aop"
 5       xmlns:tx="http://www.springframework.org/schema/tx"
 6       xmlns:context="http://www.springframework.org/schema/context"
 7       xsi:schemaLocation="
 8       http://www.springframework.org/schema/beans
 9       http://www.springframework.org/schema/beans/spring-beans.xsd
10       http://www.springframework.org/schema/tx
11       http://www.springframework.org/schema/tx/spring-tx.xsd
12       http://www.springframework.org/schema/aop
13       http://www.springframework.org/schema/aop/spring-aop.xsd
14       http://www.springframework.org/schema/context
15       http://www.springframework.org/schema/context/spring-context.xsd
16       ">
17    <!-- 扫描service包下所有使用注解的类型 -->
18    <context:component-scan base-package="cn.wmyskxz.service"/>
19
20    <!--配置事务管理器  -->
21    <bean id="transactionManager" class="org.springframework.jdbc.datasource.DataSourceTransactionManager">
22       <property name="dataSource" ref="dataSource"></property>
23    </bean>
24
25    <!--配置通知  -->
26    <tx:advice id="txAdvice" transaction-manager="transactionManager">
27        <tx:attributes>
28            <!-- 传播特性 -->
29            <tx:method name="save*" propagation="REQUIRED" />
30            <tx:method name="add*" propagation="REQUIRED" />
31            <tx:method name="insert*" propagation="REQUIRED" />
32            <tx:method name="delete*" propagation="REQUIRED" />
33            <tx:method name="del*" propagation="REQUIRED" />
34            <tx:method name="remove*" propagation="REQUIRED" />
35            <tx:method name="update*" propagation="REQUIRED" />
36            <tx:method name="modify*" propagation="REQUIRED" />
37            <tx:method name="find*" read-only="true" />
38            <tx:method name="query*" read-only="true" />
39            <tx:method name="select*" read-only="true" />
40            <tx:method name="get*" read-only="true" />
41        </tx:attributes>
42    </tx:advice>
43    <!--配置切面  -->
44    <aop:config>
45        <aop:advisor advice-ref="txAdvice" pointcut="execution(* com.fjm.ssm.service.*.*(..))"/>
46    </aop:config>
47 </beans>
5.4 Spring MVC 的相关配置
spring-mvc.xml
 1<?xml version="1.0" encoding="UTF-8"?>
 2<beans xmlns="http://www.springframework.org/schema/beans"
 3       xmlns:xsi="http://www.w3.org/2001/XMLSchema-instance"
 4       xmlns:context="http://www.springframework.org/schema/context"
 5       xmlns:mvc="http://www.springframework.org/schema/mvc"
 6       xsi:schemaLocation="http://www.springframework.org/schema/beans
 7       http://www.springframework.org/schema/beans/spring-beans.xsd
 8       http://www.springframework.org/schema/context
 9       http://www.springframework.org/schema/context/spring-context.xsd
10       http://www.springframework.org/schema/mvc
11       http://www.springframework.org/schema/mvc/spring-mvc-3.0.xsd">
12
13    <!-- 扫描web相关的bean -->
14    <context:component-scan base-package="cn.wmyskxz.controller"/>
15
16    <!-- 开启SpringMVC注解模式 -->
17    <mvc:annotation-driven/>
18
19    <!-- 静态资源默认servlet配置 -->
20    <mvc:default-servlet-handler/>
21
22    <!-- 配置jsp 显示ViewResolver -->
23    <bean class="org.springframework.web.servlet.view.InternalResourceViewResolver">
24        <property name="viewClass" value="org.springframework.web.servlet.view.JstlView"/>
25        <property name="prefix" value="/WEB-INF/views/"/>
26        <property name="suffix" value=".jsp"/>
27    </bean>
28
29</beans>
5.5 jdbc.properties 中配置数据库连接池
jdbc.driver=com.mysql.jdbc.Driver
#数据库地址
jdbc.url=jdbc:mysql://localhost:3306/ssm?useUnicode=true&characterEncoding=utf8
#用户名
jdbc.username=root
#密码
jdbc.password=root
#最大连接数
c3p0.maxPoolSize=30
#最小连接数
c3p0.minPoolSize=10
#关闭连接后不自动commit
c3p0.autoCommitOnClose=false
#获取连接超时时间
c3p0.checkoutTimeout=10000
#当获取连接失败重试次数
c3p0.acquireRetryAttempts=2
5.6 创建接口和实现类,调用 mapper 接口实现数据调用
 1@Service
 2public class ItemsServiceImpl implements ItemsService {
 3
 4    @Autowired
 5    private ItemsExtMapper mapper;
 6    @Override
 7    public List<Items> queryItemsByItemsQuery(ItemsQuery vo) {
 8        return mapper.ItemsQuery(vo);
 9    }
10}
参考:
https://www.cnblogs.com/wmyskxz/p/8916365.html
https://www.cnblogs.com/fengjunming/p/7583229.html**